

Brick lintel repair is a critical aspect of maintaining the structural integrity of buildings. It involves addressing damages and issues that can compromise the load-bearing capabilities of lintels, which are essential for supporting openings like doors and windows. This guide provides a comprehensive overview of how to perform brick lintel repair effectively, ensuring the safety and durability of your masonry work.
Table of Contents
What is a Brick Lintel?
A brick lintel is essentially a strong, horizontal block that spans the gap between two vertical supports. It’s most commonly found above doors and windows, providing critical support to the weight of the structure that rests above these openings. Knowing the role and various types of brick lintels is crucial for anyone involved in building maintenance or repair. From solid brick to reinforced concrete, each type offers different benefits and challenges when it comes to installation and upkeep. Understanding these can help you better manage the longevity and safety of the building’s structural components.
Signs of Lintel Failure
When it comes to maintaining the integrity of brick lintels, recognizing the early signs of failure is key. Let’s dive deeper into these signs to ensure you’re well-prepared to act quickly if these issues arise.
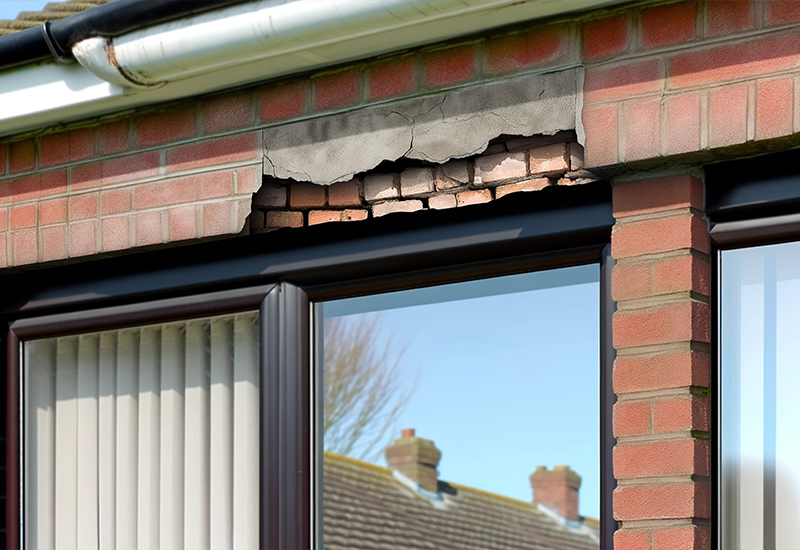
1. Cracking
One of the first signs you might notice are cracks. These can be horizontal, which usually means the lintel is struggling under the weight it’s meant to support. Alternatively, diagonal cracks could suggest a more complex structural issue. These cracks often appear in the mortar or within the bricks just above the opening of a window or door. Spotting these cracks early can make a big difference in addressing the problem before it escalates, saving you time and money on more extensive repairs.
2. Bowing or Sagging
If the lintel starts to bow or sag, this is a clear indication that it’s not holding up the load above as effectively as it should. This can often be seen as a visible sag in the middle of the lintel or a bowing effect where the lintel appears to bend outward. This distortion is not only unsightly but also a red flag for structural safety, necessitating swift action to reinforce or replace the failing lintel.
3. Masonry Displacement
Another critical sign of lintel failure is the displacement of masonry around the lintel. This includes the movement or bulging of bricks near the lintel area, which might result in visible gaps or an uneven distribution of the wall’s surface. This type of displacement can compromise the wall’s stability and integrity, making it imperative to address these issues promptly.
Each of these signs of lintel failure — cracking, bowing or sagging, and masonry displacement — are indicators that your building’s structural elements are under stress. Recognizing these signs not only helps in taking timely corrective actions but also prevents potential hazards and further damage to the property. Regular inspections and maintenance are recommended to keep these issues at bay and ensure the longevity of your structure.


Preparing for Lintel Repair
Proper preparation is crucial to successfully repairing a brick lintel. Here’s how you can gear up for the task to ensure everything goes smoothly and safely.
1. Inspection
First things first, you’ll need to thoroughly inspect the lintel and surrounding area to assess the extent of the damage. Look for the signs of failure we discussed, like cracking, bowing, or masonry displacement. Determining the root cause of these issues is also critical; this could be due to age, environmental factors, or structural loads. Understanding what you’re dealing with helps in planning the most effective repair strategy.
2. Materials Needed
To get started with the repair, you’ll need to gather the right materials. Here’s a basic list:
- Replacement bricks: Ensure they match the existing bricks in size and color for a seamless repair.
- Mortar: Choose a type that complements the existing structure’s strength and composition.
- Tools: Basic masonry tools will include a chisel, hammer, trowel, and possibly a mixer for the mortar.
Additionally, depending on the severity of the repair, you might need supports to temporarily hold the structure while you work on the lintel.
3. Safety Precautions
Safety cannot be overstated when it comes to structural repairs. Here are some essential safety measures:
- Personal Protective Equipment (PPE): Always wear safety goggles, gloves, and a dust mask to protect against brick dust and debris.
- Secure the area: Use barriers or caution tape to keep bystanders away from the repair site.
- Proper scaffolding: If the repair is at a height, ensure that the scaffolding is stable and secure to prevent any falls or accidents.
Taking the time to prepare thoroughly can make your lintel repair project go more smoothly and safely, reducing the risk of further damage or injury. Always consider consulting a professional if the damage seems extensive or beyond your DIY skills.
Step-by-Step Brick Lintel Repair Process
Repairing a brick lintel involves several critical steps. Each phase must be handled with care to ensure a successful repair that restores the structural integrity and appearance of your building.
Step 1: Removing Damaged Material
Before you can start fixing, you need to clear out the problem areas. Here’s how to do it right:
- Safety First: Before beginning, ensure you’re wearing your PPE to protect against dust and debris.
- Removing Loose Bricks: Gently chisel away any loose or damaged bricks and mortar. Be careful not to apply too much force to avoid further damage to the surrounding masonry.
- Cleaning the Area: Once all unstable material is removed, use a brush to clean out the debris, ensuring a clean work area for new materials.
Step 2: Preparing the Lintel Area
Getting the area ready for new bricks and mortar is crucial for a durable repair:
- Assess and Clean: After removing the damaged materials, assess the underlying area for any hidden issues and clean it thoroughly.
- Apply a Binding Agent: If necessary, apply a binding agent to the existing brickwork to ensure a strong bond with the new mortar.
Step 3: Rebuilding the Lintel
With the area prepped, you can start the rebuilding process:
- Laying New Bricks: Begin laying the new bricks, carefully matching them with the existing structure in size, color, and texture.
- Applying Mortar: Use the trowel to apply mortar evenly. Make sure each layer is compact and fills the joints completely.
- Leveling: Continuously check that the new lintel is level as you rebuild. This is crucial for both aesthetic and structural reasons.
Step 4: Curing and Sealing
After the lintel is rebuilt, it’s not quite ready to bear load just yet:
- Curing the Mortar: Allow the mortar to cure completely, which can take several days depending on the climate and type of mortar used.
- Sealing for Protection: Once cured, apply a sealant to the lintel and surrounding masonry to protect against weather and moisture, which will help prevent future damage.
Following these steps carefully will help ensure that your brick lintel repair is successful, extending the life of your building’s masonry and maintaining its aesthetic appeal. Regular check-ups after the repair can also prevent future issues, keeping your structure safe and sound.
Maintenance Tips to Prevent Future Lintel Issues
Regular maintenance is crucial for prolonging the life of brick lintels and preventing future issues. Here are some practical strategies you can implement to keep your lintels in top condition.
1. Periodic Inspections
- Frequency: Conduct inspections at least twice a year, ideally during the spring and fall, to catch any potential issues early.
- What to Look For: Check for signs of cracking, bowing, or masonry displacement that might indicate early failures.
- Documentation: Keep a record of each inspection, noting any changes or areas of concern. This can help track deterioration over time and aid in early intervention.
2. Proper Drainage Solutions
- Keep Gutters Clean: Ensure that gutters and downspouts are free of debris. This prevents water buildup, which can seep into the masonry and cause damage.
- Waterproofing: Apply waterproofing compounds to the masonry around lintels to help repel water and prevent it from entering the structure.
- Landscaping Considerations: Ensure that the landscaping does not direct water towards the building. Slope the ground away from the foundation to help divert water.
3. Repair Minor Damage Promptly
- Quick Fixes: Address small cracks and loose joints by filling them with appropriate caulk or mortar. This can prevent water infiltration and more significant damage.
- Professional Help: If you notice significant damage, consult a professional for a thorough assessment and repair.
4. Improve Load Distribution
- Assess Load Bearing: Ensure that any renovations or modifications to the building do not inadvertently increase the load on existing lintels.
- Support Adjustments: If necessary, install additional supports to redistribute the load more evenly across the lintel.
Maintenance Schedule Table
Here’s a detailed table to help you keep track of maintenance activities:
| Activity | Frequency | Details |
| Inspections | Biannually | Check for cracks, bowing, displacement. |
| Gutter Cleaning | Biannually | Before spring rains and after autumn leaves fall. |
| Waterproofing | Every 2-3 years | Reapply waterproofing compounds around lintels. |
| Landscaping Checks | Annually | Adjust landscaping to ensure proper water flow. |
| Minor Repairs | As needed | Fill minor cracks and fix loose joints promptly. |
| Load Assessment | After changes | Review after renovations or adding heavy fixtures. |
By following these maintenance tips and using the schedule as a guide, you can effectively manage the health of your brick lintels and avoid costly repairs in the future. Regular upkeep not only preserves the structural integrity of your building but also maintains its aesthetic value.
Troubleshooting Common Lintel Repair Issues
During the process of repairing brick lintels, several common issues may arise. Knowing how to effectively resolve these problems can save you both time and effort, ensuring the longevity and stability of your repairs.
1. Mortar Does Not Adhere
- Cause: The surface may be too dry or dirty, preventing the mortar from adhering properly.
- Solution: Ensure the brick surface is clean and slightly damp before applying new mortar. This helps the mortar adhere better and cures more evenly.
2. Misaligned Bricks
- Cause: Bricks may be laid unevenly, leading to structural weaknesses and an unsightly appearance.
- Solution: Use a level and string line as guides when laying bricks to ensure they are both level and straight. Adjust as necessary before the mortar sets.
3. Cracks Reappearing After Repair
- Cause: This could be due to settling, improper curing, or insufficient repair of the underlying issue.
- Solution: Ensure that all underlying issues, like foundation problems, are addressed before repairing the lintel. Additionally, allow the mortar to cure slowly by shielding it from extreme weather conditions during the first few days.
4. Water Leakage Post-Repair
- Cause: Inadequate sealing or improper drainage around the lintel area.
- Solution: Apply a waterproof sealant around the repaired area and ensure that all gutters and downspouts are clear and functioning properly to divert water away from the building.
Troubleshooting Table
To help you manage these issues more effectively, here’s a detailed table outlining common problems, their potential causes, and solutions:
| Issue | Potential Causes | Solutions |
| Mortar Not Adhering | Dirty or dry surface, poor mortar mix | Clean and dampen surface, check mortar consistency |
| Misaligned Bricks | Improper laying technique, uneven base | Use leveling tools, adjust base as needed |
| Recurring Cracks | Unresolved structural issues, improper curing | Address structural causes, shield mortar while curing |
| Water Leakage | Inadequate sealing, poor drainage | Apply waterproof sealant, ensure proper drainage |
By following these troubleshooting tips and using the table as a quick reference, you can effectively handle common problems encountered during the brick lintel repair process. Regular monitoring and maintenance after the repair can also help prevent these issues from reoccurring, ensuring the durability and aesthetic appeal of your masonry work.
Conclusion:
In conclusion, brick lintel repair is essential for maintaining the structural stability of your property. Regularly monitoring and addressing any signs of wear and tear can prevent major damages and ensure the longevity of your building. If you’re seeking professional assistance for brick lintel repair, don’t hesitate to contact us at +(1) 917-477-9667 to get expert help and reliable service.
FAQs:
Q: What are the common signs that brick lintel repair is needed?
A: Brick lintel repair becomes necessary when you notice signs like cracking, sagging, or displacement in the lintel area. These symptoms indicate that the structural integrity might be compromised.
Q: How often should I schedule inspections for brick lintel repair?
A: It’s advisable to schedule inspections for brick lintel repair at least once every two years to ensure that any potential issues are caught and addressed early.
Q: What materials are best for brick lintel repair?
A: The best materials for brick lintel repair typically include quality mortar that matches the existing setup and new bricks that are similar in composition and color to the original masonry.
Q: Can I perform brick lintel repair myself or should I seek professional help?
A: You can handle minor brick lintel repairs as a DIY project, but professionals should handle significant issues to ensure they perform the repairs safely and correctly.
Q: What preventative measures can extend the life of a brick lintel?
A: Preventative measures for brick lintel repair include regular inspections, ensuring proper drainage around lintels, and using quality materials for any repairs or constructions.