
Learning how to repoint bricks is essential for maintaining the structural integrity and aesthetic appeal of your brickwork. This guide provides a comprehensive overview of the process, offering practical advice to ensure your repointing project is successful. By following these steps, you can protect your property from damage while enhancing its appearance.
Table of Contents
What is Brick Repointing?
Brick repointing, also known as pointing or tuckpointing, is a meticulous process that revitalizes the external part of mortar joints in masonry construction. It involves carefully removing the old, damaged mortar and replacing it with fresh mortar. This maintenance technique is not just about aesthetics; it’s crucial for the longevity and safety of masonry structures. Over time, exposure to elements like rain, wind, and thermal changes can create voids between the bricks. These voids allow water to seep in, leading to damage through frost weathering and salt dissolution. If not addressed, this deterioration can progress, compromising the integrity of the brickwork.
Why is Repointing Necessary?
Repointing is essential for several compelling reasons. It’s not just about fixing what you can see; it’s also about preventing future problems and maintaining the building’s overall health and aesthetics.
Prevents Water Damage
When it comes to maintaining a brick structure, one of the crucial benefits of repointing is its ability to prevent water damage. Water is often the silent enemy of brick buildings. It seeps into tiny cracks and voids where it can freeze, expand, and cause further cracking, exacerbating the damage. By repointing, you seal these mortar joints effectively. This barrier keeps out moisture and prevents the deterioration that leads to costly repairs. Regularly maintaining these joints not only prolongs the life of the walls but also ensures the internal parts of your building remain dry and free from moisture-related issues.
Structural Integrity
Repointing plays a pivotal role in maintaining the structural stability of brick constructions. Mortar might seem like a mere filler between bricks, but it significantly contributes to the building’s overall stability and strength. Over time, environmental factors and general wear and tear degrade mortar, leading to gaps that reduce the wall’s ability to bear load and resist external forces. By removing the weakened mortar and replacing it with new, durable material, repointing restores the wall’s robustness. This process helps distribute weight evenly again, preventing potential structural failures and extending the building’s lifespan.
Aesthetic Appeal
Another compelling reason to undertake repointing is to enhance the aesthetic appeal of your property. With time, mortar can discolor, crumble, and detract from the overall look of a building. Fresh, clean mortar lines can dramatically improve a building’s facade, making it look well-cared-for and aesthetically pleasing. This improvement is particularly vital for historical buildings where preserving the architectural details and appearance can also preserve the building’s historical significance and value.
Increases Property Value
Given the improvements in structural integrity and appearance, repointing can also increase the property value. Well-maintained buildings are more appealing to potential buyers or tenants and can fetch higher prices on the market. For commercial properties, this maintenance translates into a better business image, potentially attracting more customers or clients.
Energy Efficiency
Finally, repointing contributes to the energy efficiency of a building. By sealing gaps in the mortar, you minimize air leaks. In winter, this means less cold air enters the building, and in summer, less cool air escapes. This improvement can lead to significant savings on heating and cooling costs, making your building more energy-efficient and comfortable.
By addressing these aspects, repointing not only preserves the structural and aesthetic quality of your building but also enhances its functional value, making it a wise investment for any property owner.
Tools and Materials Needed for Repointing Bricks
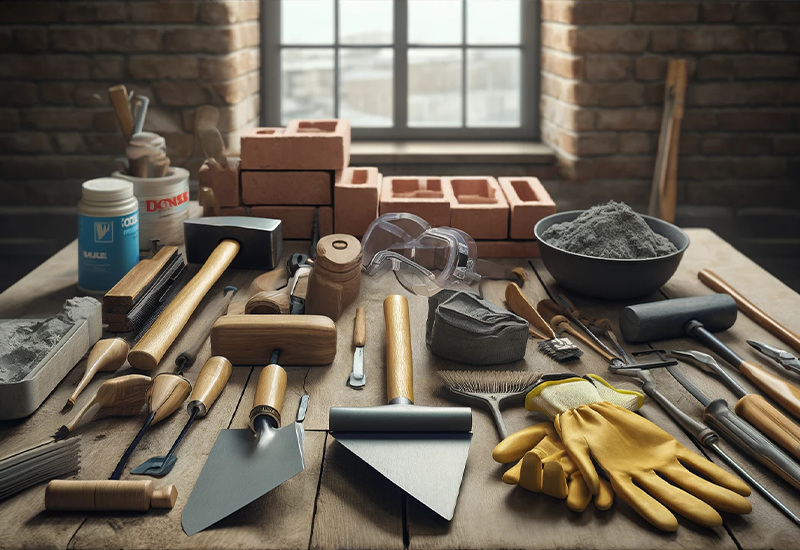
Proper repointing requires specific tools and materials. Let’s walk through each one, explaining its purpose and how it contributes to a successful repointing project. This checklist will ensure you’re well-prepared before starting the job.
1. Chisel
A chisel is used to remove old, deteriorated mortar from between the bricks. Opt for a narrow chisel to maneuver within tight joints without damaging the bricks.
2. Hammer
You’ll need a hammer to work alongside the chisel. It helps in chipping away the old mortar efficiently. A small sledgehammer or a masonry hammer is ideal for this task.
3. Mortar Mix
The choice of mortar mix is crucial. It must match the existing mortar in strength, color, and composition to ensure the integrity and appearance of the wall. For older buildings, a lime-based mortar is typically recommended to accommodate the building’s structural movements and ensure breathability.
4. Mortar Hawk
A mortar hawk is a flat, square tool used to hold the mortar while you apply it to the joints. It makes the job cleaner and more efficient, allowing for easy transport and application of the mortar.
5. Pointing Trowel
This small, narrow trowel is designed for filling in new mortar. Its size and shape allow for precise control, which is essential when working on detailed masonry work.
6. Joint Raker
Before applying new mortar, you must clear out old mortar to a proper depth. A joint raker is used for this purpose, helping to ensure that the joints are clean and ready for new mortar.
7. Stiff Bristle Brush
A stiff bristle brush is used to clean out dust and debris from the joints after raking them out. This step is crucial for ensuring that the new mortar adheres properly to the bricks.
8. Safety Glasses and Gloves
Safety should always be a priority. To protect your eyes from flying debris, ensure you wear safety glasses. Similarly, gloves are essential for guarding your hands against sharp edges and the caustic mortar mix.
Table of Tools and Their Uses
| Tool | Use |
| Chisel | Removing old mortar |
| Hammer | Assisting the chisel in removing mortar |
| Mortar Mix | Filling joints with new mortar |
| Mortar Hawk | Holding and applying mortar |
| Pointing Trowel | Precisely applying mortar into the joints |
| Joint Raker | Cleaning out old mortar to prepare for new |
| Stiff Bristle Brush | Cleaning dust and debris from the joints |
| Safety Glasses | Protecting eyes from debris |
| Gloves | Protecting hands from sharp objects and mortar |
Each of these tools plays a vital role in the repointing process, ensuring that the job is done efficiently and safely. Proper preparation and having the right tools at hand are the first steps to a successful repointing project, helping restore the brickwork to its original strength and beauty.


Step-by-Step Guide to Repointing Bricks
Repointing bricks is a meticulous process that, when done correctly, can significantly extend the life of your building’s masonry. Here’s a step-by-step guide to help you get it right.
1. Safety First
Always start by prioritizing safety. Before you begin, make sure to wear safety glasses and sturdy gloves. These will protect your eyes from flying debris and your hands from sharp edges and abrasive materials. It’s also wise to wear a dust mask to avoid inhaling any fine particles.
2. Removing Old Mortar
The first step in the repointing process is to remove the old, deteriorated mortar. Use a joint raker for this task. Carefully rake out the loose and damaged mortar without applying too much force, as excessive pressure can damage the bricks. This step is crucial; proper cleaning ensures that the new mortar adheres well and lasts longer.
3. Preparation of New Mortar
Next, prepare your new mortar mix. Follow the manufacturer’s instructions closely to get the consistency right. The color of the new mortar should closely match the existing mortar to maintain a uniform appearance across the wall. This might require some trial and error with pigments if the original mortar is aged or uniquely colored.
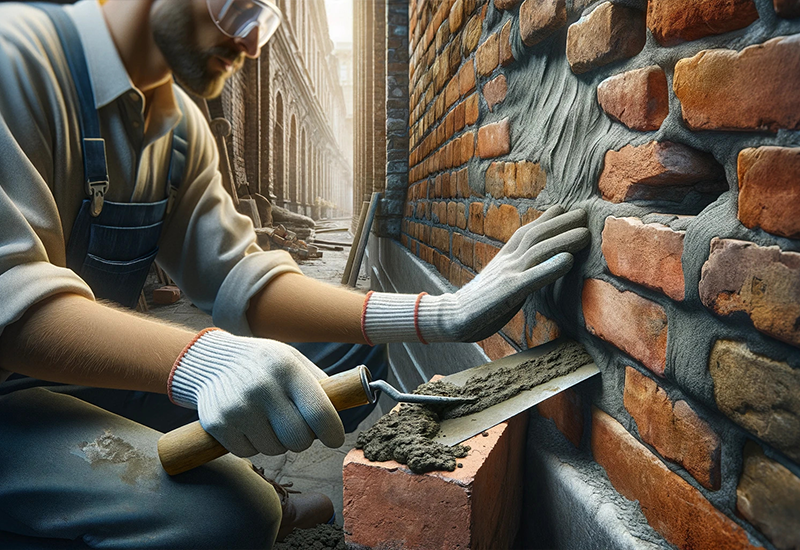
4. Applying the Mortar
Once your mortar is ready, use a mortar hawk to carry it as you work. Apply the mortar into the cleaned joints using a pointing trowel. Be meticulous in this process to ensure the mortar is well-compacted and completely fills the joints. This prevents future water ingress and ensures the longevity of your repointing work.
5. Finishing Touches
After filling the joints, allow the mortar to set until it’s just thumbprint hard. At this stage, use a jointing tool to carefully smooth and shape the mortar, ensuring a tidy and professional finish. Finally, use a stiff bristle brush to remove any excess mortar from the brick face. This step will help in keeping the bricks clean and neat, enhancing the wall’s aesthetic appeal.
6. Curing
The last step is to cure the mortar. Keep the newly repointed areas damp for several days to allow the mortar to cure slowly and develop maximum strength. You can do this by misting the area with water several times a day. Slow curing prevents the mortar from drying too quickly, which can lead to cracks and reduce the mortar’s longevity.
7. Maintenance Tips
After repointing, it’s good practice to check the condition of your brickwork periodically, especially after extreme weather conditions. Regular maintenance can catch potential issues early, before they require extensive repairs.
This comprehensive guide ensures that each step in the repointing process is carried out with precision and care, resulting in a durable and visually pleasing outcome. Remember, while repointing is a manageable DIY project for small areas, larger or more structurally significant projects often warrant professional expertise.
Maintenance Tips for Repointed Brickwork
Maintaining your repointed brickwork is crucial to ensure it remains in top condition for many years. Regular maintenance not only extends the life of the mortar and bricks but also keeps your building looking its best. Here’s what you should keep an eye on:
Regular Inspection
Make it a habit to regularly check your brickwork for any signs of wear or damage. Look for cracks, crumbling mortar, or loose bricks. Early detection of these issues can help prevent more extensive and costly repairs later. Ideally, inspect your brickwork at least twice a year—once in the spring and once in the fall. This timing allows you to catch any damage from winter freezing or summer heat.
Cleaning Brickwork
Annually cleaning your brick walls is another important maintenance task. Use a hose and a stiff brush to gently clean the bricks. This method helps remove dirt, debris, and any biological growth such as moss or algae, which can retain moisture and lead to damage over time. It’s important to avoid using harsh chemicals or high-pressure washers, as these can erode the mortar and damage the bricks. Instead, opt for mild, brick-friendly cleaners if necessary, and always rinse the surface thoroughly with plain water after cleaning.
Avoiding Chemical Damage
When choosing cleaning solutions, ensure they are suitable for use on brick. Harsh chemicals can accelerate mortar deterioration and discolor the bricks. If unsure, always test the cleaner on a small, inconspicuous area first or consult a professional.
Prompt Repairs
If you notice minor issues during your inspections, address them promptly. Small cracks or gaps in the mortar can be fixed relatively easily if caught early. Delaying repairs can allow water to enter, leading to more significant problems.
Professional Assessment
If you’re unsure about the condition of your brickwork or if you identify significant damage, consider hiring a professional to assess the structure. They can provide expert advice and, if necessary, perform more complex repairs that go beyond basic maintenance.
By following these simple maintenance tips, you can help ensure that your brickwork remains durable, attractive, and structurally sound. Regular care not only preserves the aesthetic appeal but also maintains the overall value of your property.
Conclusion
Understanding how to repoint bricks is vital for anyone looking to preserve their building’s longevity and aesthetic value. This process not only safeguards the structure from potential damages but also enhances its overall curb appeal. If you’re seeking professional help to repoint bricks, feel free to contact us at +(1) 917-477-9667 for expert services.
FAQs
Q: What tools are needed to repoint bricks?
A: To repoint bricks, you will need a chisel, hammer, mortar mix, mortar hawk, pointing trowel, joint raker, and stiff bristle brush. These tools help in removing old mortar and applying new mortar precisely.
Q: How often should I repoint bricks?
A: The frequency of how to repoint bricks depends on the exposure of your brickwork to elements. Typically, it’s good practice to check and possibly repoint every 15 to 20 years.
Q: Can I repoint bricks myself or should I hire a professional?
A: While it’s possible to repoint bricks yourself for small projects, hiring a professional is recommended for extensive or structural work to ensure it is done correctly.
Q: What type of mortar should I use to repoint bricks?
A: The type of mortar used to repoint bricks should match the existing mortar in strength, color, and composition. For older buildings, a lime-based mortar is often recommended.
Q: Why is it important to repoint bricks?
A: It is crucial to repoint bricks to prevent water damage, maintain structural integrity, and enhance the aesthetic appeal of your building. Properly executed repointing seals the mortar joints from elements.